Tuesday, July 21, 2015
Moving to a New Blog!
Technological difficulties have forced me to start a new blog since my photos have been disappearing here, and I can't seem to be able to find any help. My new blog is called Mix It Up With Ink, and you can get to it by clicking here. The new blog is in the very earliest of stages, but we gotta start somewhere. I'll be posting there from now on, so I hope you'll follow me to the new blog. I'm planning a giveaway to welcome new followers once I get it all set up and cool & whatnot. See ya there!
Monday, July 20, 2015
Wendy Vecchi Make Art Challenge--July 2015

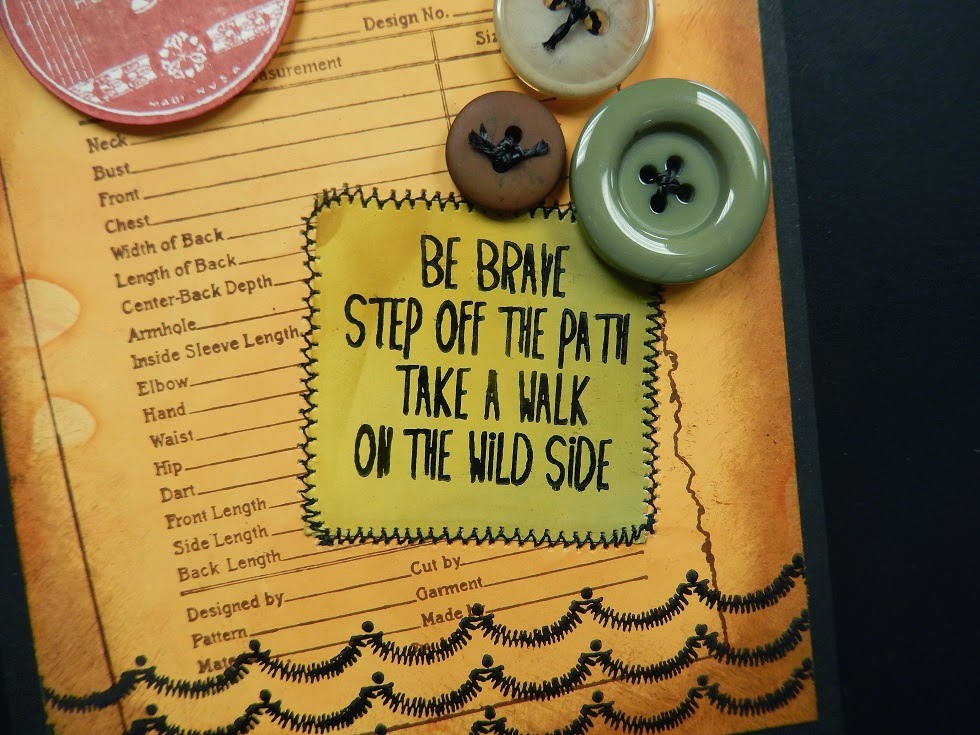
Look at me, on a roll! Kelly and I had another artsy play day, and we decided to work on projects for the Wendy Vecchi Make Art Challenge Blog (to view the challenges, click here). Every month, they post a challenge, and you have to use at least one Wendy Vecchi product while working on the challenge. This month's challenge is Polka Dots. Also, you can enter up to 6 times per challenge, so I made two cards. This first one uses Wendy's phrenology head, and all the shading on her is done in dots! I'm using my creative license here.
The background was made using Wendy's alcohol and Archival re-inker technique (if you'd like to see Wendy demoing this technique click here). Using 3 colors was a challenge, because they get muddy quickly, and you end up with brown. I got lucky here, and I thought it was mind blowing, so, a-ha moment, use the phrenology head stamp! I stamped her with Archival Jet Black ink and embossed with Ranger's Clear Embossing Powder.

I juggled a lot of things in my day today, so I thought about all the multi-tasking we do daily and what our minds would look like when being blown ... hence, the words. I also stamped these with Jet Black Archival ink and embossed with clear embossing powder. It was a little tedious, because I didn't want the words to smear, so I stamped, added powder, and heated after each and every word. I love the way she turned out! These word stamps were from two different Stampin' Up! sets (retired).

On the bottom, I used one of Wendy's stencils and her black embossing paste, and I added the angled lines at the bottom. When that was dry, I used another stencil and added the scallop tops. I mounted this onto some back card stock with some black fun foam to pop it up.

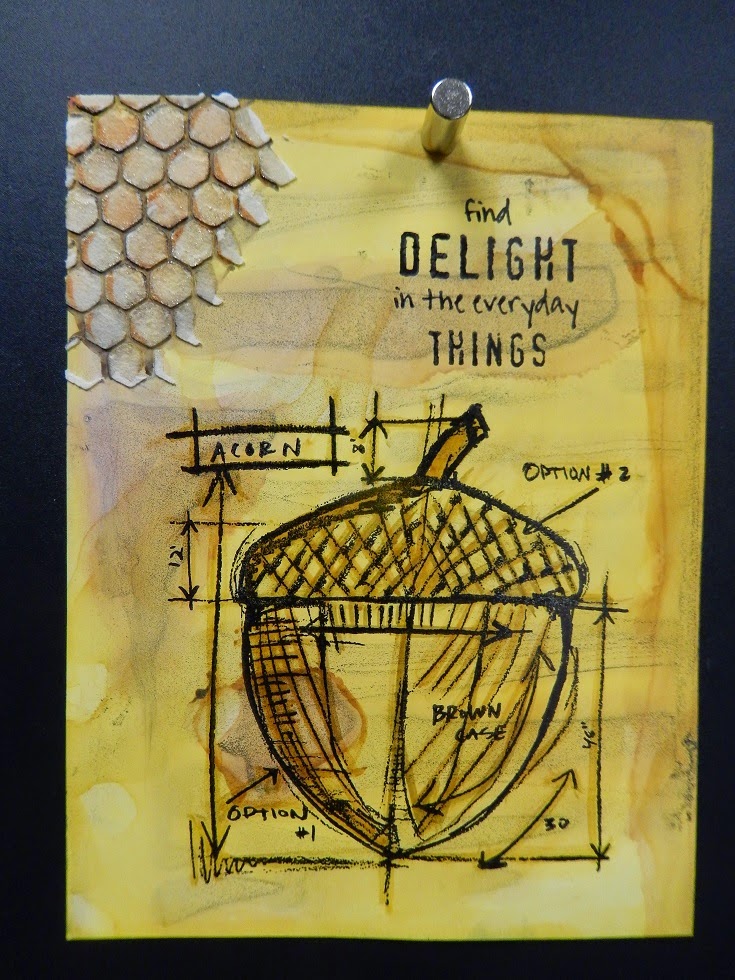
You can never make just one background when doing Wendy's alcohol technique, so this next one was screaming for some trees. I first noticed this particular stamp last year at a class I took with Wendy in Connecticut. I had to have it! It's from the Trademark Art set, #SCS132.
The dots at the top were made using one of Tim Holtz's stencils and Wendy's black embossing paste again. The trees were stamped with Jet Black Archival ink, and the word is from Tim's ChitChat pad in kraft, with Black Soot Distress Ink on the edges. I popped up the word with some foam, and then popped up the whole piece onto some black cardstock.
Sunday, July 19, 2015
July Tim Tag

Just a quick post so I can get my tag in for Tim's tag of the month. You can see Tim's original tag here. Of course, Tim did a 4th of July theme, but I like to just do the techniques with a neutral theme, not holiday. My new sewing machine was acting up on me. Think I need some thicker thread.
Since today was my birthday, I kind of guilted Kelly into making one with me. Her tag is below, and I absolutely LOVE it!

I love her colors, her stamps, everything. I think she did a beautiful job!
Tuesday, June 30, 2015
Info on Classes
I was just asked about my classes ... Where/when. I teach in my studio, here in my home. I haven't taught any in a couple of months (taking a break from creating designs, and focusing on learning new skills and being the student). I'll be going to England with Wendy Vecchi (owner/designer of Studio 490, and Signature Designer for Ranger) in July, so I'm not sure if I'll be holding any classes until after I return. When I do plan a class, I post the class information here on the blog, and also send email invites. If you'd like to get on my email list, send your information to stefrick@verizon.net (name, email addy, interests, what level do you work at ... Beginner, intermediate, expert?). That's the best way to find out what's going on in "Mrs. Rodgers' Neighborhood."
Now, for the type of classes I teach, and how they run ... I prepare and supply everything. You just need to bring your own adhesive and a refill. Some ladies also bring their own scissors and/or bone folder, so they don't have to wait for the shared tools. I also make a color sheet describing each technique, supplies used to make sample, and step-step instructions to make more at home! My classes rarely have more than 6 students. I prefer small classes ... Students have more room, and I can give more attention when needed. Classes are usually from 6:30-9pm. I have a daytime job now, so I need everyone to be out by 9pm so I can relax a little before going to bed.
Techniques Class: make 3 cards while learning new techniques $20.
Make Your Own Embellishments Class: no need to buy cute embellishments that you get home and find they don't match well with your project. I show you different techniques to make your own! No specific project will be made, just embellishments for you to take home. $20-$25 (depending on supplies cost).
Scrapbooking Techniques: Learn different and creative tricks and techniques to use in your scrapbooking. No specific project will be made, just samples of techniques for you to take home. $20-$25 (depending on supplies cost).
Jewelry Class: working on this. I have lots of tip & techniques up my sleeves. Gotta work out the details.)
So, if you're interested, send me an email at stefrick@verizon.net and I'll put on my mailing list.
Thanks!
Stephanie
Monday, April 6, 2015
Make-Art-Challenge-Blog: Archival Reinkers

Tanya & I were busy again in the studio, and today we worked on some cards for the Make-Art-Challenge-Blog with Wendy Vecchi. I won last month's challenge ... let's see if I can do it again! You can check out the blog by clicking here, and get in on the fun. If you sign up on Bloglovin', you'll get a notification each month for the new challenge. This month's prize is Wendy Vecchi products from Stamper's Anonymous!
The challenge is to use the Archival reinkers, so what better way than to do Wendy's alcohol/reinker technique? We each started out with 8 pieces of Ranger's Specialty Stamping Paper. We played with all of Wendy's colors and created all kinds of backgrounds. I finished first, and Tanya still had 3 more to make.
We started to make cards, and I spent the rest of the morning working on this one, where Tanya got 3 done! We decided I'm quicker at backgrounds, and she's quicker at embellishing. lol

This particular piece is probably the one that looks the least like her famed technique, because I only used one color, Dandelion. You can see a little of the layers on the left side.
I used an old set by Wendy called Just Sew Artsy LCS028. The saying is from another old set, Seriously Art LCS034. The saying in stamped on one of the other backgrounds I made with the reinkers ... I believe Dandelion, Leaf Green and Red Geranium. I stitched it onto my card, but the scalloped stitches are from a stamp.
Below, are the 3 cards Tanya made:

I'm trying to get her to start posting what she makes on Pinterest so she can enter these challenges too.
Sunday, April 5, 2015
April 2015 Tim Tag

Happy Easter! Tanya is here for a few days visiting my son, so after our family dinner with the Curleys at Legal Seafood, Tanya & I decided to make the latest Tim Tag! Every month Tim creates a tag chock full of techniques, and he gives step by step instruction with pics so you can try all the techniques.
This month's tag is so gorgeous, we pretty much copied it exactly. We used the same stamps & colors as Tim, but we had to get creative with the sayings since I still haven't received my script or block words yet. You can see Tim's tag, with all the instructions here on his blog.

Here's a close up of the beautiful watercolor coloring on the flowers.

I got a new Brother sewing machine for Christmas that I could dedicate just to paper crafts, and we took it for the first test drive tonight! Somehow, I ended up with a small zig zag stitch, but we loved it some much, Tanya did it on hers as well. It was a little tricky around the corners, and a little tense, but it came out great!
Here's Tanya's tag ...

Her background came out with larger bursts of color, and I think it looks magnificent with the pink flowers!

Beautiful coloring on her flowers!

She's giving this tag to her cousin, so she chose "forever family", cause Chantal can't get rid of her! haha
Wednesday, April 1, 2015
Winner for Masking Challenge

I entered this card into the Masking challenge at A Blog Named Hero (sponsored by Simon Says Stamp), and I just found out I won! I'll be receiving a generous $25 Gift Certificate to www.simonsaysstamp.com!
I really enjoyed making this card. It was the first time I tried using Frisket Masking Fluid. I chose a small, simple stamp design to try it out (Dina Wakley stamps by Ranger), and I just love how it turned out! You'll be sure to see more cards like these in my future!
Subscribe to:
Posts (Atom)